Reagans-monogram-tshirt (10)Mini Bestie just turned one! Since she’s a 1/2 Florida Girl she definitely needed a Lilly Pulitzer inspired monogram tee to make it through Raleigh’s winter.

I used Hooked on Applique’s pointed circle monogram paired with a pink and white floral print.

To further embellish the long sleeve black tee I added oink ric-rack to the bottom and a decorative stitch to the cuffs. Too cozy and cute, not too bad for my first attempt at a full blown applique tee with my new Brother Dreamweaver XE.

Reagans-monogram-tshirt (1)Reagans-monogram-tshirt (2)Reagans-monogram-tshirt (3)Reagans-monogram-tshirt (4)Reagans-monogram-tshirt (5)Reagans-monogram-tshirt (6)Reagans-monogram-tshirt (7)

IMG_3951

I created this super cute banner with some simple techniques.

No step by step pictures, but I do have some time saving tips:

  • Don’t stitch around the letters, use fusible applique, it’s not going to be washed, so you’re good.
  • Rather than trying to close the top seam, serge it and cover up your serge with ribbon or wide rickrack.
  • Make the back thin muslin so that it turns better, and to save your pretty fabric.
  • Method for the letters, is the same as my Birthday Applique Tee

In action =)

Levi-bday-audra (3)

Cute and versatile to use over and over too!

Little darling Levi just celebrated his big first birthday!

Momma Audra contacted me with an idea and I ran with it of course.

IMG_3953
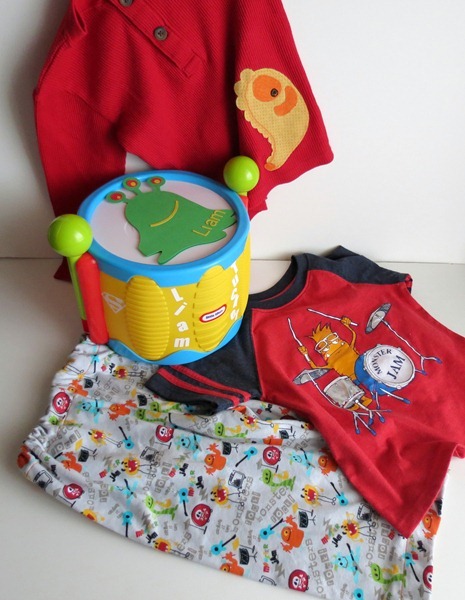
Since this was a small amount of letters, yay short names, I didn’t break out the Cricut.

Instead I

1. Picked fonts and sized everything as word art in Microsoft Publisher (Publisher gives you better, make this 2” tall abilities").

2. Mirrored the image and printed.

3. Traced the mirrored image on the paper side of Heat n Bond  Sewable

4. Snip out roughly, then iron on to back of fabric.

5. Cut out letters, shape following your lines.

6. Iron on to the shirt.

7. Outline the shirt as desired, if you used the sewable.

Easy and sooo cute!

This got covered in birthday smash cake, and is going to be featured in Levi’s first birthday shadowbox, how sweet is that?

Levi and Uncle A

Levi-first-birthday-party-004
When we were invited to a Batman themed third birthday party, I KNEW I needed to expand my Superman cape skills into Batman as well.
01-IMG_3961
Using the same method I used in my Super Hero Cape Tutorial and a Batman outline printout, I created this, which was a total hit!
On the back side I  embroidered a “3” and a heart with a “K”
Ethans-3rd-Birthday-Party-001
09-IMG_3985Gotta keep the cape in line.10-IMG_3987

Also be sure to check out his 2nd Birthday Elmo shirt Tutorial from last year!
Elmo-Theme-2nd-Birthday-Gift

Monster-Birthday-Gift (2)

After making some Monster PJ Pants, and a monster card, I knew I needed some coordinates. A cozy store bought Henley was perfect for embellishing, and I got lucky and happened upon a little tee-shirt that featured a Monster playing the drums, soo lucky!

Initital-Back-Shirt (2) Initital-Back-Shirt (5)

For the tee shirt, I went simple and added a “P” in the Ravie font, to the back, I cut it with my Cricut but the machine had some trouble, probably would have been easier to just trace it to some Heat n Bond Lite. Monster-Applique-Shirt (6)

I then top stitched it using orange thread to match the monster on the front.Monster-Applique-Shirt (10)

Little Monster Shirt (1)Little Monster Shirt (3)
For the Henley I cut the Monster shape using the Cricut Cartridge Bump in the Night. Then using the heat n bond lite scraps I always save I added his mouth, and eye, and the tail.

Monster-Applique-Shirt (9)

Then using orange thread I topstitched all around him, and then using my machine stitch sampler I decided to give him some more texture using a decorative stitch along his back.

Monster-Applique-Shirt (12)


This post is partying here.

Monster-Birthday-Gift (2)
Read about the card & drum in this post.

Our dear friend’s little one was turning two and I was wondering JoAnn’s looking for cute little boy fabric, which is always hard for this pink and green loving gal, I just don’t gravitate towards ‘boy stuff’, lol!
After lots of wondering I stumbled onto the perfect fabric. A ‘boy’ knit with a monster rock band on it ($9/yrd) , complete with a drummer, perfect since we were also getting him his first drum!

Monster-Knit-PJ-Pants (1)  Monster-Knit-PJ-Pants (4)
Monster-Knit-PJ-Pants (3)
Then I had to decide what to make with my stretchy find. After flipping through all the books, I ended up getting New Look 6932, since it had tons of sizes of kid’s pjs and was only $3.99.  I’m glad I did, I’m sure it will remain handy since I don’t have any kids clothes to draft my own simple patterns from.. (Sadly no pattern sales were going on to help guide my searching).
Photo
These came together super quick with my serger, and with the way they are constructed you only need to deal with 3 ‘serger tails’.  I only used the 3T PJ pant pattern piece, and barely followed the directions.
Monster-PJ-Pants (1)
I laid out the piece on a the folded piece of knit.
Monster-PJ-Pants (2)
Pattern Pieces cut.

Monster-PJ-Pants (3)
Serge the legs. (Note this is the first time I’ve switched my serger to 4 thread from rolled hem, so glad I did, I even got all my tensions right!
Monster-PJ-Pants (4)
Leg seams sewn.
Monster-PJ-Pants (5)
Matching your front and back slopes, turn 1 leg right side out, and stick it inside the inside out leg, line up seam.

Monster-PJ-Pants (6)
Serge the “U”. (I wish I had practiced and adjusted my differential feed since this turned out a little wavy.Monster-PJ-Pants (7)
Monster-PJ-Pants (8)
Monster-PJ-Pants (9)
This is for threading your elastic, and lets you make it adjustable.

Monster-PJ-Pants (10)
You know that stitch that looks like a triple topstitch? Well that’s actually a stretch stitch and it’s what you’ll want to use here. I also used my walking foot to keep everything nice and flat.
Now all that’s left is tucking your three ‘serger tails’, trimming threads, and threading the elastic waistband.

I had so much fun crafting up a monster themed 2nd Birthday Present.Monster-Birthday-Gift (2)
Last year my Superman Cape was a hit, so I knew I had to come up with something fun and cute.
Look for posts on the Monster PJ pants, and the tee shirt appliques this week, but I’ll share the drum and the monster card with you now.

Monster PJ Pants Tutorial Post
image
I made the card from the Cricut Cartridge Bump in the Night.
Monster-Birthday-Card (3)Monster-Birthday-Card (2)
image
Using cream contact paper, I used the font “Impact” to cut his first and middle name. I’ll definitely use this font for a vinyl sticker again, it cut very well. I also cut out a couple superman symbols to add to his drum, and the back of his card.
The Little Tikes drum was a hit, and even drummer boy Andrew had some fun with it.
IMG_1650Name-Sticker-Drum (2)
I pinned a car seatback toy pouch on my Cute Things for Little Peoples Pinterest board and got some interest from a friend, a couple days later and a few hours of experimenting I came up with this simple to make version.
Hanging-Seatback-Toy-Pocket-023
Contain your car clutter by making a seat back toy pouch, it’s even reversible! The best part is the strap makes it very easy to convert the pouch into a tote, perfect for keeping little one's occupied at your destination.
Sewing not your thing? You can purchase a custom toy pouch in my shop.
Finished size 12” wide and 13” tall.
Materials:
  • Contrasting Cotton Fabric 12.5” x 14”
  • Clear Vinyl 18” x 13.5”
  • 16” Bias Tape
  • 19.5” Ribbon
  • Pellon Craft Fuse (Stiff interfacing) 12.5” x 14”
  • 1 Suspender Clip 
  • Double Needle
  • Thread
Steps:
Hanging-Seatback-Toy-Pocket
Cut all 3 pieces and your Pellon Craft Fuse. The two fabrics & craft fuse will be cut 12.5” wide and 14” tall.  The vinyl is cut 18” x 13.5” (Vinyl needs generous seam allowances). Once done cutting following the fusible’s directions attach the craft fuse to the the back of one of the fabrics. (I fused mine to the denim). 
Hanging-Seatback-Toy-Pocket-003
Prep your machine for sewing with a double needle, when doing small projects I use a second bobbin as my “second spool.” When sewing vinyl you HAVE to use a double needle or your seams will rip right out.

Hanging-Seatback-Toy-Pocket-009
Sew bias tape around the top edge of the vinyl. When sewing with vinyl use clips instead of pins so you don’t poke holes in it.

Hanging-Seatback-Toy-Pocket-010
Layer your pieces right sides together. Bottom is denim with the Pellon Craft Fuse. Then add your vinyl, create two pleats to make the vinyl width match the fabric with a 1/4” sticking out. (The vinyl has a 1/2” seam allowance. The fabric has a 1/4” seam allowance").   Top with your contrast fabric, and clip.
Hanging-Seatback-Toy-Pocket-011
Sew along the 3 sides with a 1/4” seam allowance with a double needle. Clip corners.

Hanging-Seatback-Toy-Pocket-012
Turn, you can very very carefully press, inside the ‘pocket’ if you must. (You can ‘reverse’ the pouch by switching which side you turn the vinyl to).

Hanging-Seatback-Toy-Pocket-016
Fold under the extra 1” of fabric on the top opening and press carefully. Take the end of your ribbon and sandwich it within the seam on one end. Stitch the top closed with the double needle.

Hanging-Seatback-Toy-Pocket-019
Sew your suspender clip onto the other end of the ribbon, creating a strap that can go around the headrest of the car. (These clips are much stronger than you think!)


I hope you enjoyed this tutorial, if you make one I’d LOVE to see it, comment with a link, Facebook, or email me! And if anything is unclear, PLEASE ask!

Sewing not your thing? You can purchase a custom toy pouch in my shop.
This post is partying here.

http://www.salttree.net/2012/09/open-call-tuesday-21.html