Easy-Snowman-Applique (4)

When I made Fun Thread’s Mr. October I knew that I wanted to make the hanging reversible, since I was working with a rectangle I didn’t think that a turkey design would work out, so I came up with a snowman design, it went off without a hitch thanks to the skills I learned in Mr.October. Want to make your own? I’ve done a full tutorial complete with pattern for you!

Materials

  • Pattern: Download the FREE tracing pattern here.
  • Backing fabric: cut to 23” x 13.5”
  • White Fabric “Snow” 4.5” x 13.5”  I freehanded the snow drifts.
  • Scraps for Hat, body, scarf, arms.
  • Embroidery Floss
  • Buttons
  • Whatever border you want, I used 1.5” grosgrain ribbon.

Steps

Snowman-Applique-Tutorial-Hello-Kirsti-001

Print out the FREE pattern and then trace it on to Heat n Bond Lite (if you want to sew around your pieces like I did in Mr. October) or Heat n Bond Ultra Hold like I’m doing here.  Then roughly cut out the pieces.

Snowman-Applique-Tutorial-Hello-Kirsti-003

Dig through your scrap collection for the perfect hat, nose, and scarf fabrics. Then iron your roughly cut Heat n Bond Ultra Hold pattern pieces onto the wrong side of the fabric.  Let cool then carefully cut out the pieces following your traced line.

Snowman-Applique-Tutorial-Hello-Kirsti-004

Take your White Fabric “Snow” 4.5” x 13.5” piece and cut ‘snow drifts along the top.

Snowman-Applique-Tutorial-Hello-Kirsti-005
Sew the snow drifts on top of the bottom of your Backing fabric (23” x 13.5” ) (I chose to cut away the covered up backing fabric since it was showing through the white snow). The I sewed 5 rows of wiggle stitches following the curves to give the snow drifts some texture.

Snowman-Applique-Tutorial-Hello-Kirsti-006
Remove the white paper backing from your snowman pieces, then layout the pieces on the backing deciding where you want everything. If you want to add embroidery floss accents to any of the pieces now is the easiest time. I added fringe to the bottom of the scarf by double knotting short pieces. I blanket stitched around the top hat. I whip stitched around the carrot noise. I added decorative stitching to the hat band as well.
 
Snowman-Applique-Tutorial-Hello-Kirsti-008

Once you’re done decorative stitching lay out the pieces again and using a piece of parchment paper or a press cloth (helps keep things from moving on you) iron all the pieces to the backing fabric.

Snowman-Applique-Tutorial-Hello-Kirsti-011
Sew
on your button eyes and button mouth using embroidery floss.

Finishing


Snowman-Applique-Tutorial-Hello-Kirsti-013
I placed the finished snowman on top of the finished Mr. October right sides together, then Squared the pieces so they were the same size.

Snowman-Applique-Tutorial-Hello-Kirsti-012

I chose sandwich ribbon in my seam for my border. So I laid out the ribbon to figure out roughly how much I needed.

Snowman-Applique-Tutorial-Hello-Kirsti-014

Then I pined the two pieces together sandwiching the ribbon.

Snowman-Applique-Tutorial-Hello-Kirsti-015

I then sewed the Snowman-Ribbon-Mr.October together on all sides but the top (so a U)  with a 1/4” seam using a walking foot to keep all the layers together. (optional)

Snowman-Applique-Tutorial-Hello-Kirsti-016

Through the top opening I turned the piece right side out.

Snowman-Applique-Tutorial-Hello-Kirsti-017
I then pressed them nice and crisp.

Snowman-Applique-Tutorial-Hello-Kirsti-018
Using two pieces of ribbon the width of the hanging I created a casing for hanging. I first sewed the two pieces of ribbon together at the top (the red dots in the photo). The I sewed that to the top of the hanging even with side ribbon. This left a casing that runs the whole length of the top.

Easy-Snowman-Applique (1)

I threaded some leather cord through the casing then since I couldn’t find a dowel I stuck two skewers in to keep it flat.

Then you’re done, enjoy your snowman!

Fun-Threads-Mr-October-Completed-011Click for a massive detailed view.

On Monday Carol over at Fun Threads, posted the pattern for this little cutie, with his full Texas get up that totally translates to Nashville, I HAD to make him. (Hurry the pattern is no longer free after Thursday! He’s soo cute he’s worth paying for though =)
This might be the fastest, first sight to almost completion project, ever!
Monday Night: I printed the pattern, and was super happy and surprised I had the right color fabrics and fat quarters.
Tuesday:  I made him, all that’s left is the binding but I think I want to make another hanging on the back, maybe a turkey?
As Carol promised he went together quickly, and her directions and layouts were great, this was my first ever ‘more than a tee shirt’ applique project, so I was surprised!
I added some embroidery thread to  “tie up the treats” and made a feeble attempt to decorative/texture stitch the boot soles and pumpkin stem. Then hand embroidered “Treats” on the bag, and around the pumpkin.
Fun-Threads-Mr-October-Completed-003 Fun-Threads-Mr-October-Completed-004

What are you waiting for, don’t you need a Mr. October?


Bonus Tip:

Grid Ruler on top of an ipad with the screen on = temporary light box… at least until the cat decides Heat ‘n’ bond paper is fun to sit on. (Pepper’s latest idea… sitting in the crockpot, video here).
Ipad-light-box-trick

This post is partying here.

Toddler-Dress (5)One of my near and dear “big sisters” from growing up just had her first little girl last week, Logan Beth.

She’s totally darling!! Considering I made a bunch of stuff for her October shower I should probably blog about it.

Logan is the first girl in my circle of baby fever after three boys in a row, I was soooo excited to sew little girl pink frilly things.

Photo

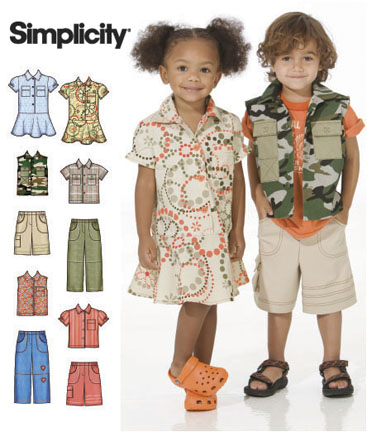
When I saw Simplicity’s 2907 combo toddler pattern during one of Joann’s super sales, I figured it was a great pick since it offers boy and girl basics perfect for gifting.

I know new mom’s always appreciate getting ‘future’ clothes so I made the dress in a size 1 (I think I can’t honestly remember… must blog faster)

It went together pretty well I think, and it’s looks darling in the big flower pattern.

This was my first collar in this method and it turned out pretty well, it’s all nicely serged inside.

Once I got out of my sewing comfort zone I stopped taking pictures, since I wasn’t confident I was doing things right, but here’s what I took to help anyone attempting this pattern, since I couldn’t find a sew-a-long for it.

I was good at making myself serger everything I could!

The button holes went well too!

Toddler-Dress (1)Toddler-Dress (2)Toddler-Dress (3)Toddler-Dress (4)Toddler-Dress (8)Toddler-Dress (9)Toddler-Dress (10)


This post is partying here.

I went to the mall do my returns from my Limited purchase extravaganza last month. I decided to stop by Forever 21, where I never shop, to see if any of the Hello Kitty Collection was left. Since Hello Kitty was released November 18th only the lounge stuff was left, and I can't really see myself paying full price for their lack of quality, I did like some of the sweater pieces though and wish I had caught them.

Hello Kitty Junkie did a great post on the Hollywood launch event if you wanna see what they had.

Well on to the point of this post... I went totally Blair Waldorf on the headband collection...
I left with 7 headbands and 1 pair of sequin bow clips for $20 with tax.

I think I'm going to have a new addiction, even better they are ALL comfy headbands, which any Blair gal knows is CRITICAL.


The super huge 80s pink bow just make be a part of a costume this October, hint hint.
Most were around $2 and are made pretty darn nicely, especially the grosgrain wrap ones.

Now I'm just trying to restrain myself from ordering more since the site has EVEN more headbands and free shipping today.

In case you wanna indulge with me...
 Forever 21      Free shipping with code 3DAYSHIP.

ohh and the best part... online you can avoid all the awkward teenage boys they have working in the store..

oh and I found a squirrely for $7.99!!
I made this back in October at 6 AM in the morning non the less, and apparently I never blogged it.
Lucy Bib (1)
The 6 AM backstory
Annually the Center for Entrepreneurship at Belmont has a alumni party at my favorite professors’ house, yes my school and it’s professors are amazing. 6 AM the morning of the party I kick myself for not thinking of making a bib for Dr.C’s first granddaughter… so I test my pattern and sewing skills to the extreme with my less than 30 min concept to reality bib, complete with topstitching! (That even looked good!) I even dare say some of speed skills came from my DECA experience with the Entrepreneurial Challenge, haha!
The photos are from the second bib I made since at the party I found out a second grandbaby was on the way, and of course she needed a matching one too!Bib Sewing (1)Bib Sewing (2)Bib Sewing (3)
I really like using the ribbon ties, took a lot of neck sizing guess work out of my speed patterning!
So there you have it record time bibs for Lucy and Eleanor =)
Lucy Bib (2)
Lucy Bib (3)

Using-Starch-in-Sewing

It took me a while before I really embraced using starch to help with with sewing projects, but now that I have I find it very helpful, stick around to learn how to best use and when.

The paramount beauty of starching what you sew is that it helps fabric behave more like paper. Let’s face it in a lot of situations paper is easier!

What you need to know:

Do not use starch with your hottest setting, the starch will build up on your iron and leave you brown ickies on your fabric.

Even not using the hottest setting, you’ll still get build up sometimes, so remember to look at your sole plate every once in a while, and go ahead and get some hot iron cleaner.

Starch washes out, so if you don’t want your project to be ‘crispy’ after you’ve used starch to sew, it will go away after you’ve washed it.

Costco has a good deal on bulk pack of it. You can also make it a in spray bottle, but I haven’t tried that yet.

Situations it helps in:

Helps keep hems pressed before sewing.

Makes ‘pleat’ planning so much easier!

Machine-Stitch-Sampler-007

Gives fabric keep it’s shape while decorative stitching, like in my Machine Stitch Sampler.
Fun-Threads-Mr-October-Completed-011Easy-Snowman-Applique (4)

Prep fabric for applique with Heat n Bond Lite. I did this in my Skeleton Wall Hanging & Snowman Wall Hanging.

Elmo-Theme-2nd-Birthday-Gift

Prepare Fabric for cutting on a Cricut Craft Cutter. I did this in my Elmo Shirt Tutorial.

You can applique with it and freezer paper rather than using Heat n Bond Lite. See a tutorial on Sew Mama Sew.

It helps eliminate edge curls on tricky knit fabrics, get the lowdown from Four Square Walls.

Four-Square-Walls
(Source)

Makes tricky thin fabrics like chiffon easier to work with, Four Square Walls actually soaked her chiffon in her homemade starch and then ironed it into dry paper!